How to Use The Weekly
Here's how I use The Weekly Time Blocking Planner. Each week has two parts: The Week Planning part and the Notes & Review part.
The Week Planning Part
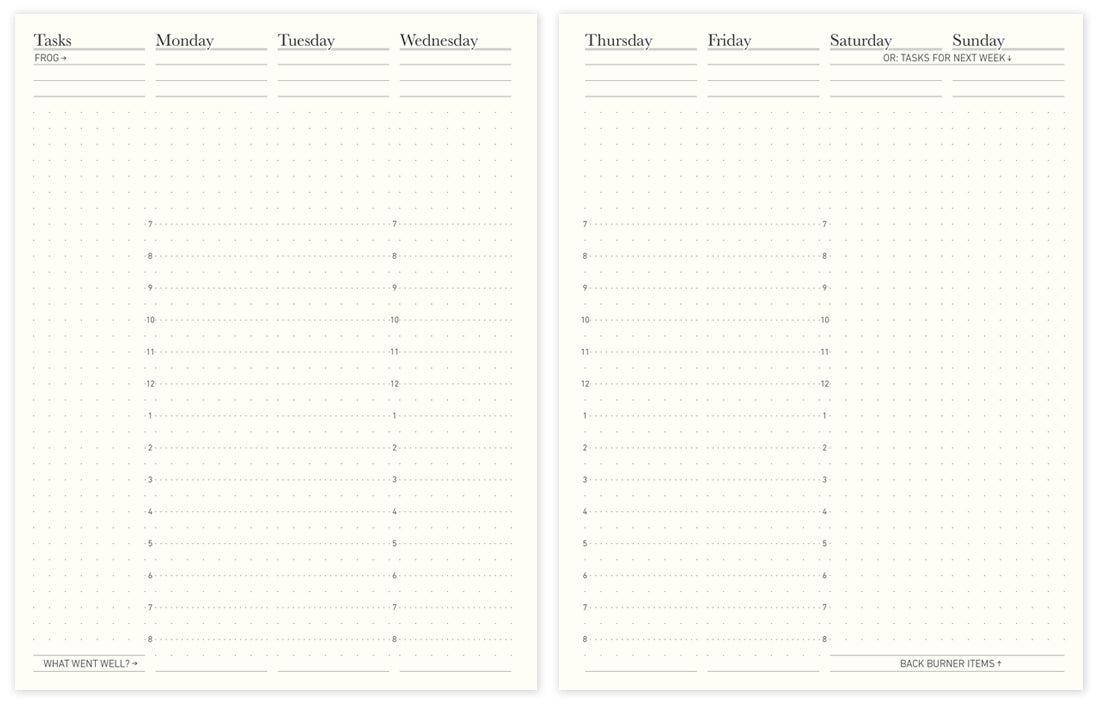
This shows the entire week in one page spread.
I sit down on Sunday night (or Monday morning) and look at my week. First, I block off the appointments using the time slots on each day. Next, in the far left "Goals" column, in the dotted lines area, I list the things I want to get done this week. This can be a simple brainstorm of tasks I can think of, but it's better if you're pulling from a list of tasks for each project you're working on, or simply looking at unfinished tasks from last week. Next to each task I estimate how long each one will take, in 15 or 30 minute increments.
Then I choose the hardest task for the week and put that at the top of the Goals column as my "Frog" for the week. The Frog is your most difficult or boring task that you have been putting off, but is most important to get done. If you get that one thing done, you'll fee more productive and a weight will be lifted off of you. I put that at the top of the column. Below it I put my next 3 most important tasks for the week.
Now that my tasks are listed, I start scheduling them into the week, blocking off the time in my schedule. Research has shown that when you decide on a time and place where you will work on your goals, you are more likely to do the work. Scheduling your tasks like this give you a plan that you can then hold yourself to, or go back to when you get distracted. It's a powerful weapon against procrastination, confusion and wasting time.
When planning out the week, I schedule the priority tasks first, then the next most important, etc. This automatically filters out the less important things, ensuring that stay most productive.
Research has shown that we have limited will power, so it's best to do the hardest tasks that you least want to do first in the day, when we have the most will power. Similarly, I find it's better for me to save the more fun tasks to the end of the day. They act almost like a reward for getting the harder ones done, and they require much less will power, so they are easier to get done even when I'm drained at the end of the day.
You don't have to plan out the entire week like this. You can just brainstorm a list of tasks and plan one day at a time in the morning. This method works better for people who have a less reliable schedule, or who are more free spirit.
Also, it must be said that my day never goes according to plan. In real life, emergent tasks come up and things take longer than expected. This is normal and fine. Simply having a plan is super helpful because it helps me stay focused on what's most important, even if it doesn't go perfectly.
When the plan gets disrupted, the temptation is to completely ignore it, but don't do this! You'll end up less efficient the rest of the day and discourages. When things get derailed, simply adjust the plan, scratch things out and move things back in the week. This helps you stay more organized: you've got a new plan, you're still working your plan, and you're enjoying seeing the progress you're making as you accomplish your tasks and check them off.
As tasks emerge that are not immediately important, you can schedule them in a later day or just list them at the top of another day and schedule them later.
There's a little spot for gratitude at the bottom. This is helpful for keeping a positive and humble attitude toward your higher power. It's helpful to remember that we have very little control over what will happen each day. Which also helps us be less stressed and frustrated when things don't go the way we expected.
The Notes & Review Part

After the Week Spread is what I call the Notes Spread. It's the two pages at the end of each week that I use to keep notes from meetings, capture ideas, track habits and review the week. I've designed this so that it has some structure that can be helpful if you want to use it, but also loose enough and light enough that you can easily ignore the structure and use them mostly like blank dot grid paper if you want. Or add your own structure.
The left page I use for meeting notes. I've got a column on the right for the date if that's helpful, or the dot is faint enough that you can ignore it. And I emphasized the dots in the middle so you can use two columns on the page, which is more efficient. But again, the dots are faint enough that you can ignore the two column format if you simply need a piece of graph paper. I just write the notes here and draw a line to delineate meetings. I find it's helpful to have notes pages in my planner so I don't have to lug multiple pads to a meeting, it's all in one tool.
The right page has a bit more structure. Most of the page can be used as a blank dot grid sheet. I use this space for capturing ideas, remember new tasks, sketching or more meeting notes. Along the right side are some promptings for you to review the week and improve for next week. It's helpful to think about what happened, what went wrong, what went right and what can be done better next time. You can write these down as you go through your week or just take a few minutes on Friday to reflect on what happened. Again, the structure is minimal enough that you can ignore this and basically use the whole top part of the sheet as a blank page.
The last bit of structure here is a habit tracking tool. It's super helpful, but not very flexible. You simply enter the habit you are trying to track or encourage on the far left line. Put your target number of reps in the target column. Then each day you track how you did. For example how many pages you read, miles you ran or whether you called your mom. At the end of the week, you put your Actual total next to the Target, and subtract your Target from your Actual to get the Net. If you ran 6 miles and your target was 5, awesome! You exceeded your goal by +1! Or if your goal was to call your mom every day and you did it once, then, well, you're still a good child, but your net is negative 6 (you might need to send her a card).
That's how I use The Weekly. Fortunately, the format is flexible enough for you to easily add or subtract your own methods to create the process that is best for you.

I’ve been using this planner for a while, and love it, I use it every day. Five stars.
One suggestion. Would it be possible to have a 52 week version of the dominator? I realize the binding limits the amount of pages that can physically be included in the dominator, but my suggestion would be to include more week pages and eliminate the meeting notes and habits pages. I believe this is what the smaller beta planner does, but I need the full size of all seven days, like this planner has. I have other media that I use to track habits, notes, etc. and just need this planner to be a planner, so these other pages are somewhat redundant in my personal system. Maybe they are useful in a different system.
Alternatively, the habits and review pages could be included in the back of the planner, possibly with a week per page. This may actually be more useful, because I could then see the weekly reviews next to each other, and spot patterns in what I struggled with in consecutive weeks. With the current layout (the weekly reviews are broken up), I can’t see those patterns.
I don’t think this would significantly increase page count. Right now it’s 36 weeks on two pages= 72 pages. I’m suggesting 52 weeks across two pages + 52 review pages double sided (26 physical pages) = 78 pages. Not a big difference.
In any case, for what I use this planner for, which is time blocking my week and uniting many different inputs (work calendar, personal calendar, workouts, errands, vacations, task list, etc.), it does better than any other option I’ve ever tried.
Thank you for this post! Very helpful as I look at my new planner!
Leave a comment